原文链接 http://dbarobin.com/2017/04/29/expansion-test-report-of-gp/
注:以下为加速网络访问所做的原文缓存,经过重新格式化,可能存在格式方面的问题,或偶有遗漏信息,请以原文为准。
文/Robin
本站推广
币安是全球领先的数字货币交易平台,提供比特币、以太坊、BNB 以及 USDT 交易。
币安注册: https://accounts.binancezh.pro/cn/register/?ref=11190872 邀请码: 11190872
0x00 目录
- Table of Contents {:toc}
| 日期 | 作者 | 文档概要 | 版本 | 更新历史 |
|---|---|---|---|---|
| 2017/04/20 | robin | Greenplum 扩容测试报告 | v1.0 | 文档初稿 |
| 2017/04/21 | robin | Greenplum 扩容测试报告 | v1.1 | 增加跨机房备注 |
0x01 前言
数据库在使用的过程中会随着数据量的增加而需要扩容,一般需要扩容的原因如下:
- 历史数据量增加,磁盘空间不足
- 计算的数据量增加,计算性能跟不上(CPU 或磁盘 IO 吞吐限制)
- 网络传输量增加,网卡限制
为了增加计算节点,Greenplum 提供了 gpexpand 扩容脚本。[1]
0x02 扩容方案
备注:Greenplum 版本:4.3.7.3 build 2,测试环境存在跨机房。另外,多图预警。
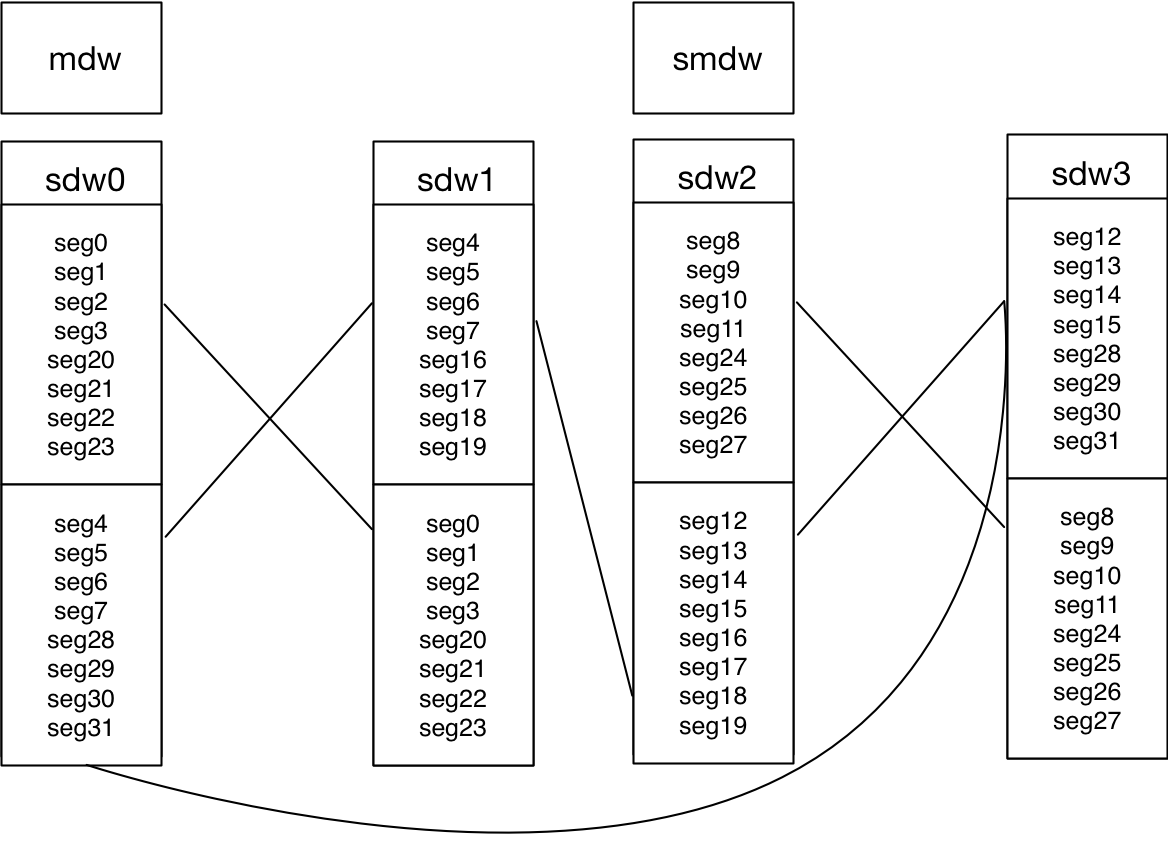
Greenplum 集群采用 Grouped Mirror 备份方案。扩容之前,共有四台机(三台机器位于 A 机房、一台机器位于 B 机房),一个 Master 节点,一个 Standby 节点,两个 Segment 计算节点。每个计算节点有 4 主 4 备,架构图如图一:

图一 扩容前 Greenplum 集群架构
此次扩容共添加 2 台机器(两台 B 机房机器),每台机器从原来的 4 主 4 备改为原来的 8 主 8 备,架构图如图二:
图二 扩容后 Greenplum 集群架构
0x03 扩容前期准备
扩容测试需要有测试数据,从线上导出了一张 127G 的表,耗时 30.16 分钟。导入到 Greenplum 测试环境中,耗时 1 h 40 min 23s。导入到 Greenplum 中,占用空间 142G。[2]
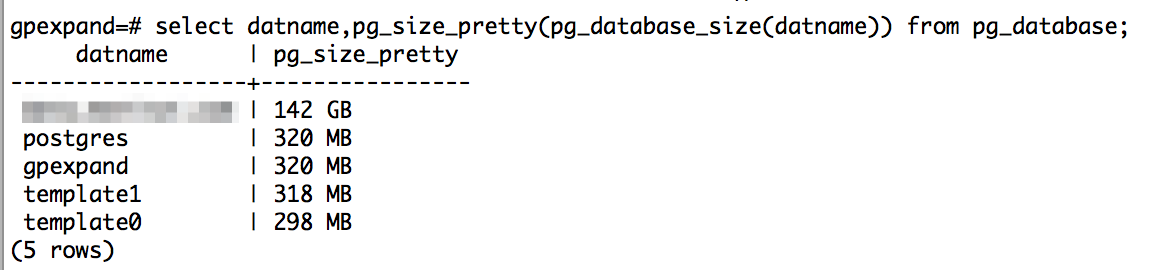
图三 databaseA 容量大小
另外,扩容前两个 Segment 节点占用空间如下:
xxx.xxx.xxx.xxx | success | rc=0 >>
83G     /data/primary
76G     /data/mirror

xxx.xxx.xxx.xxx | success | rc=0 >>
80G     /data/primary
82G     /data/mirror
另外,还需要检查磁盘空间是否充裕、服务器时间是否同步。
0x04 扩容步骤
扩容总体步骤如下:[3]
- 新加节点建立 ssh 信任,部署 Greenplum
- 初始化新 Segment 节点并加入集群
- 重分布表
- 分布完成清理
接下来做详细的扩容步骤介绍。
第一步,每台机器修改 hosts 文件,加入新加的两台机器,示例如下:
xxx.xxx.xxx.xxx hostA mdw xxx.xxx.xxx.xxx hostB smdw xxx.xxx.xxx.xxx hostC sdw0 xxx.xxx.xxx.xxx hostD sdw1 # 新加 Segment 节点 xxx.xxx.xxx.xxx hostE sdw2 # 新加 Segment 节点 xxx.xxx.xxx.xxx hostF sdw3
第二步,新建 incre_hosts 文件,包含新加 Segment 节点。
备注:第二步到最后一步,均在 maste 节点执行,注意区分不同用户。
su - root
source /usr/local/greenplum-db/greenplum_path.sh

cat all_hosts
mdw
smdw
sdw0
sdw1

cat incre_hosts
sdw2
sdw3
第三步,新加节点创建 gpadmin 用户,root 用户和 gpadmin 用户建立 SSH 等效性。
su - root
gpssh-exkeys -e /home/gpadmin/all_hosts -x /home/gpadmin/incre_hosts

su - gpadmin
gpssh-exkeys -e /home/gpadmin/all_hosts -x /home/gpadmin/incre_hosts
第四步,新加节点安装 Greenplum 可执行文件。
su - root
source /usr/local/greenplum-db/greenplum_path.sh
gpseginstall -f incre_hosts -u gpadmin -p gpadmin
第五步,检测新加节点环境。
su - root
gpcheck -f /home/gpadmin/incre_hosts
第六步,新加节点创建 primary 和 mirror 目录。
su - root
gpssh -f incre_hosts -e 'mkdir -p /data/primary'
gpssh -f incre_hosts -e 'mkdir -p /data/mirror'
gpssh -f incre_hosts -e 'chown gpadmin:gpadmin -R /data/primary'
gpssh -f incre_hosts -e 'chown gpadmin:gpadmin -R /data/mirror'
第七步,创建 gpexpand 库。
su - gpadmin
psql -d postgres
CREATE DATABASE gpexpand;
第八步,确认当前集群状态,如图四:
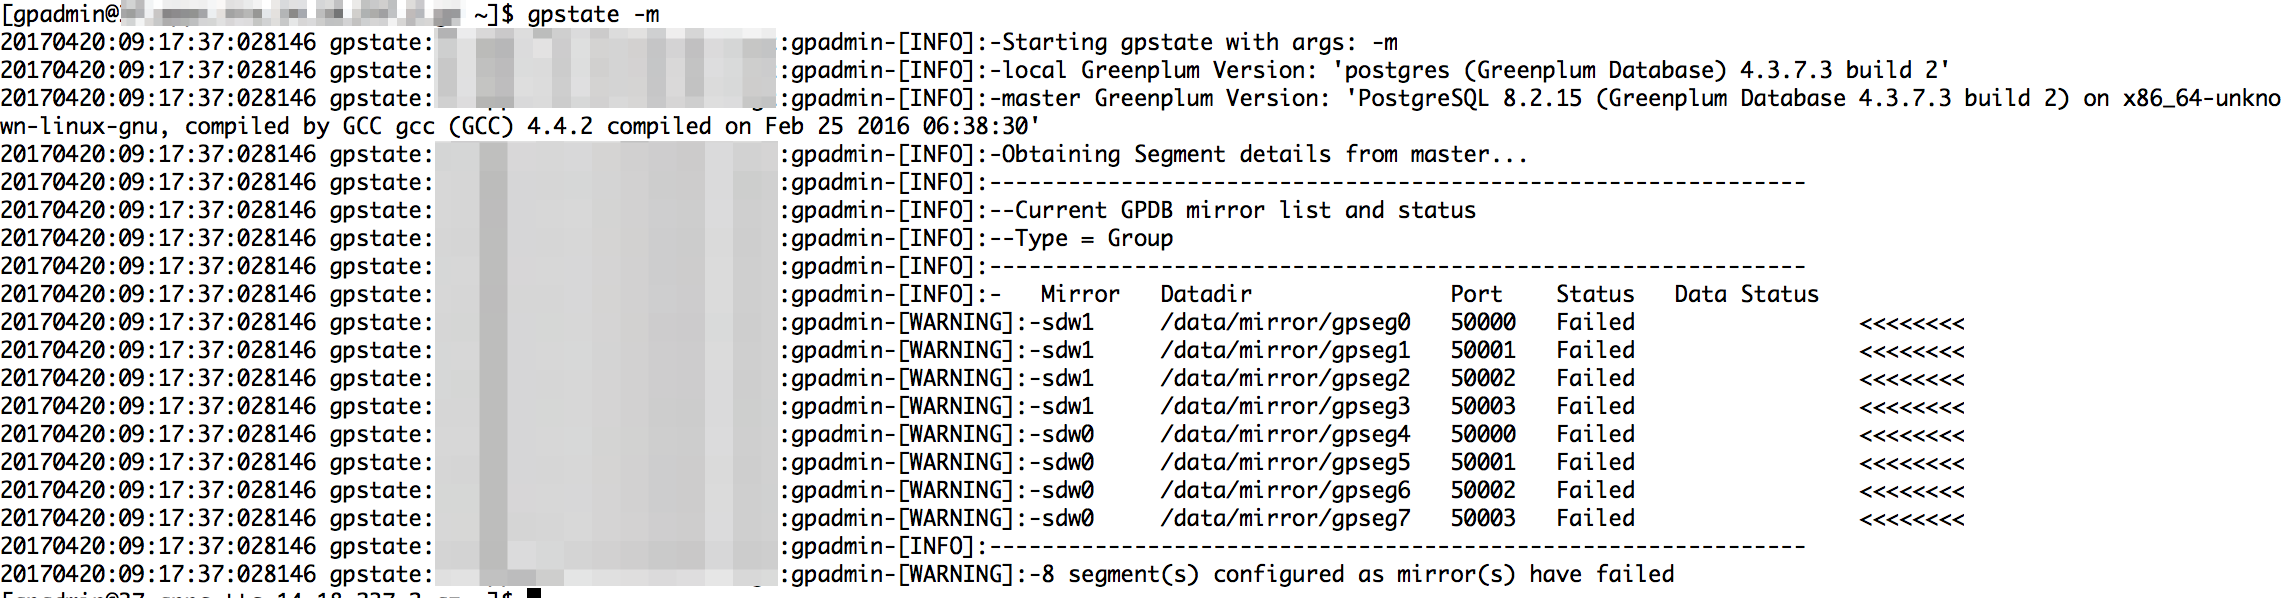
图四 当前集群状态
第九步,生成 input file。
su - gpadmin
gpexpand -f incre_hosts -D gpexpand
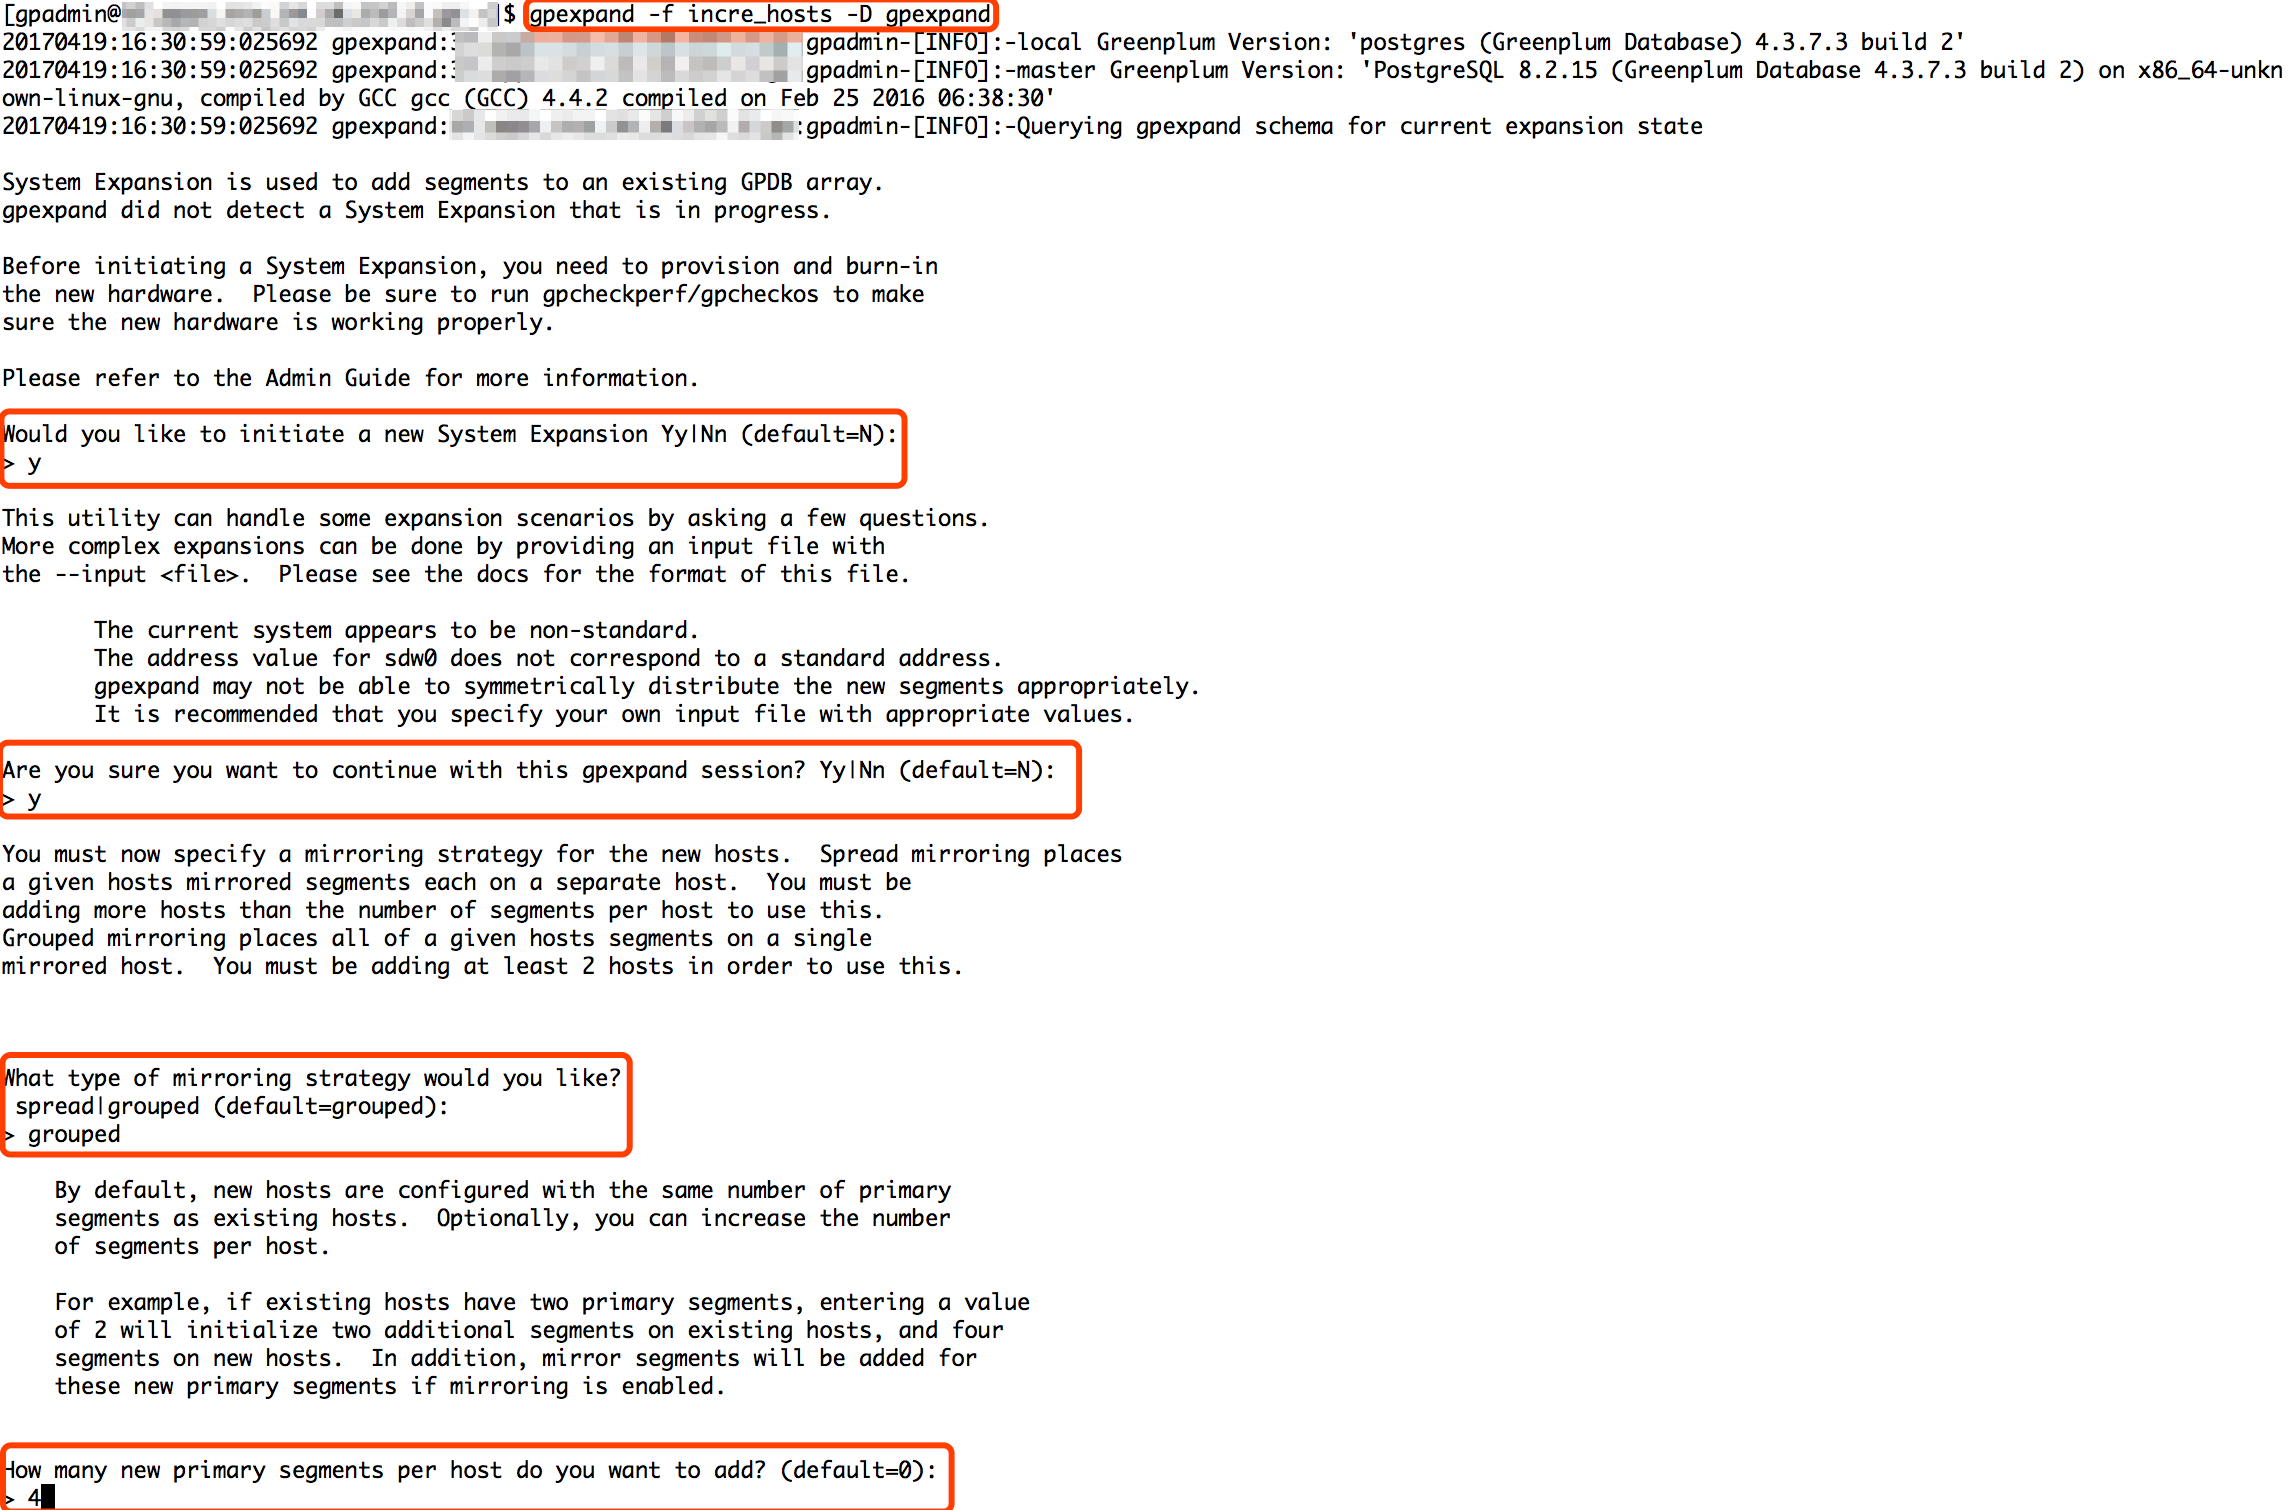
图五 生成 input file 选项
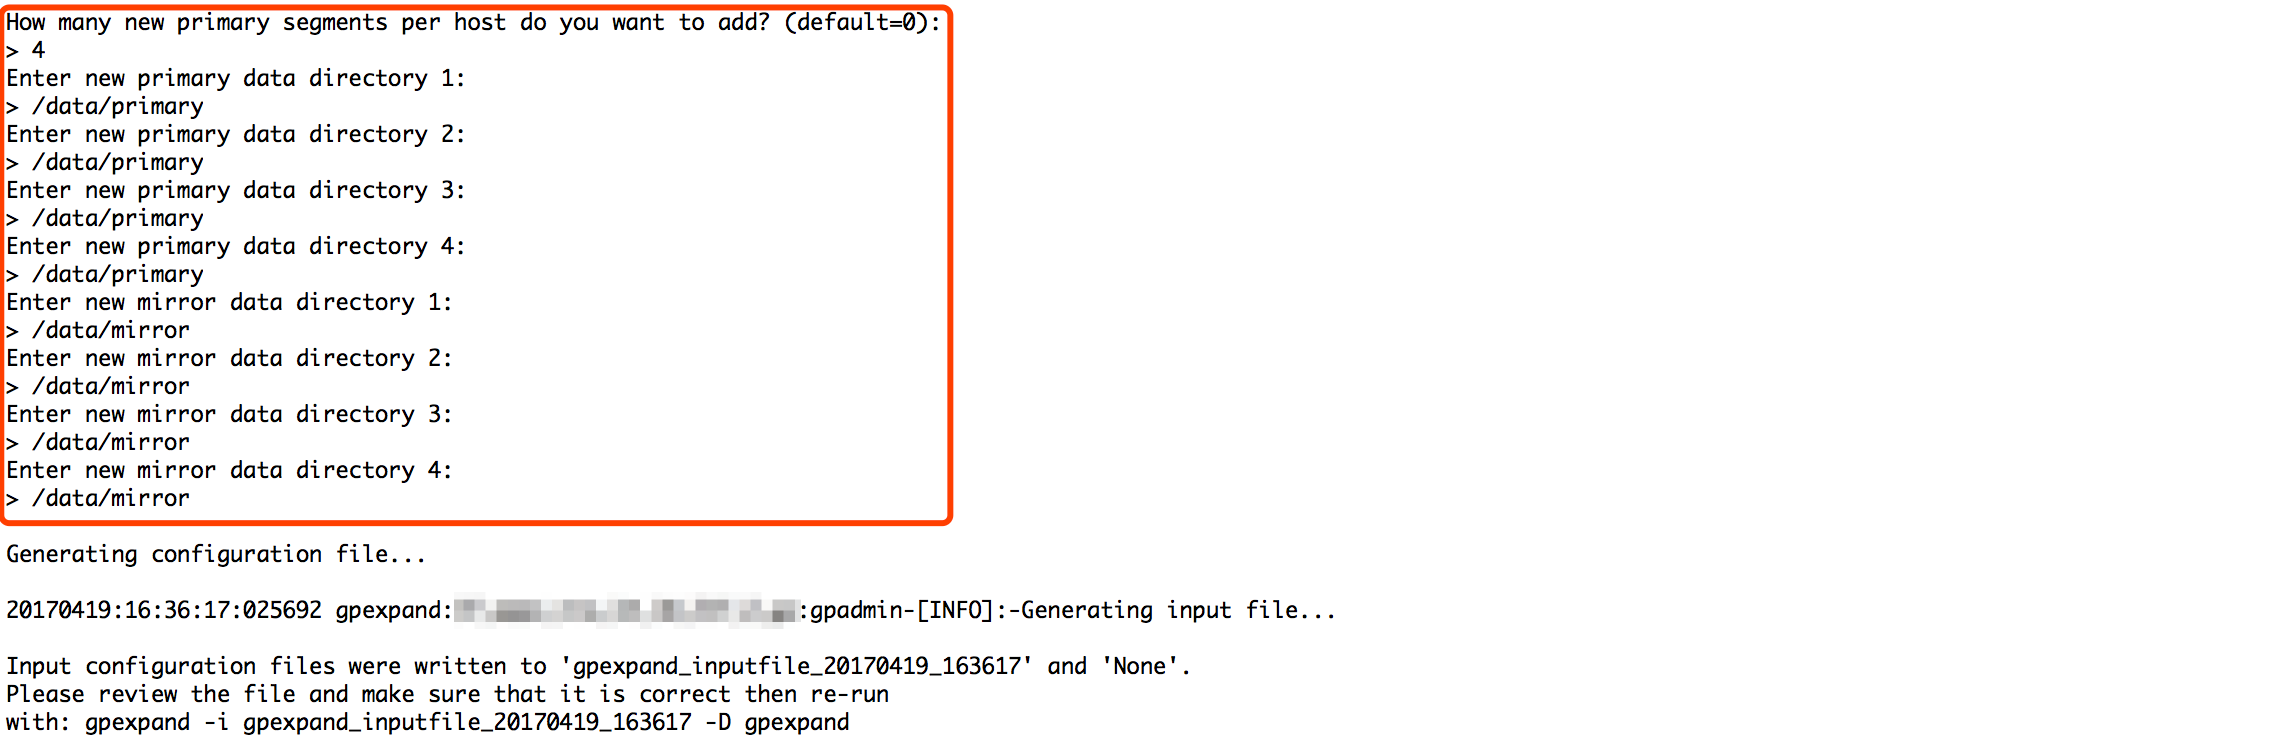
图六 生成 input file 选项之数据目录
生成的 input file 如下:
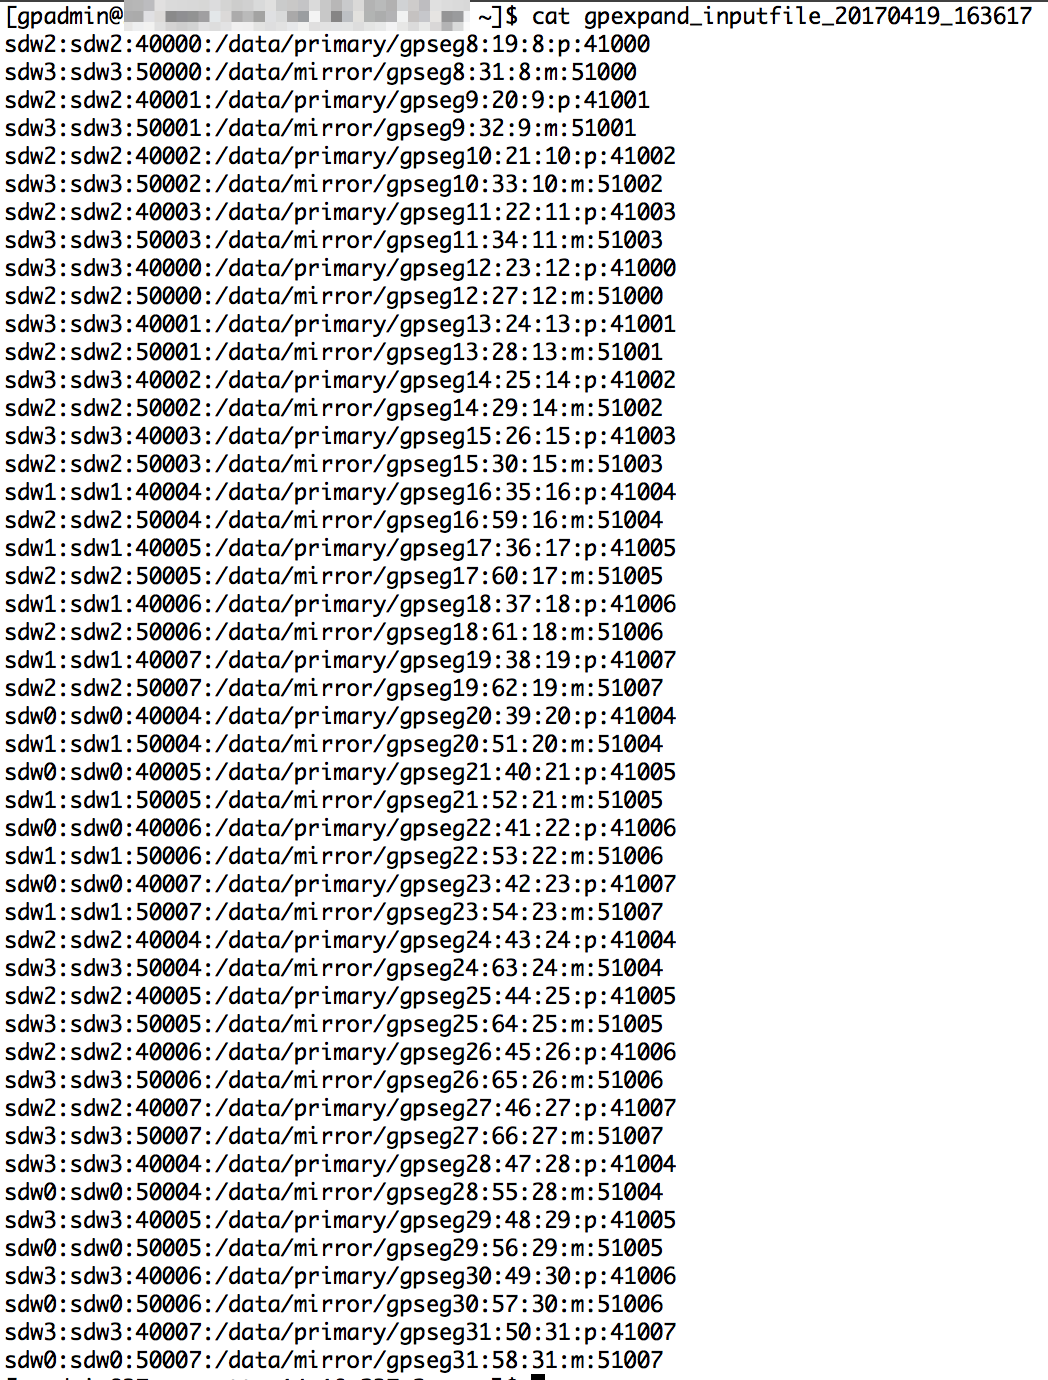
图七 生成的 input file
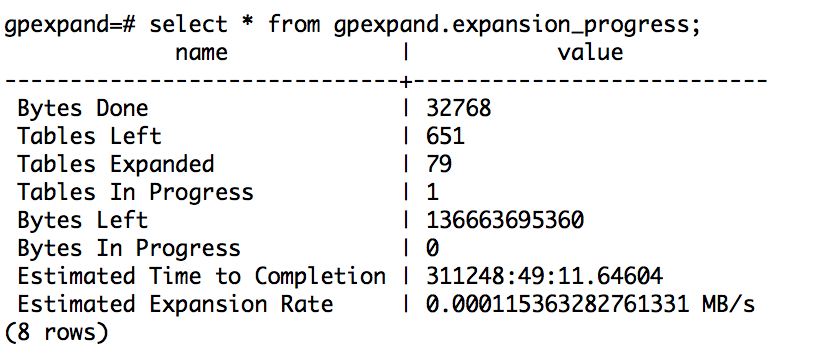
第十步,确定数据分布前状态,如图八:
图八 重新分布之前状态
第十一步,分布数据。
gpexpand -d 60:00:00 -D gpexpand
日志如下:
20170420:09:54:47:003994 gpexpand:hostA:gpadmin-\
[INFO]:-local Greenplum Version: 'postgres (Greenplum Database) 4.3.7.3 build 2'
20170420:09:54:47:003994 gpexpand:hostA:gpadmin-\
[INFO]:-master Greenplum Version: 'PostgreSQL 8.2.15 \
(Greenplum Database 4.3.7.3 build 2) on x86_64-unknown-linux-gnu, \
compiled by GCC gcc (GCC) 4.4.2 compiled on Feb 25 2016 06:38:30'
20170420:09:54:47:003994 gpexpand:hostA:gpadmin-\
[INFO]:-Querying gpexpand schema for current expansion state
20170420:09:54:52:003994 gpexpand:hostA:gpadmin-\
[INFO]:-Distribution policy for table public.student is 'no'
20170420:09:54:52:003994 gpexpand:hostA:gpadmin-\
[INFO]:-Expanding postgres.public.student
20170420:09:54:54:003994 gpexpand:hostA:gpadmin-\
[INFO]:-Finished expanding postgres.public.student
20170420:10:43:29:003994 gpexpand:hostA:gpadmin-\
[INFO]:-Distribution policy for table public.tableA is 'ext20'
20170420:10:43:29:003994 gpexpand:hostA:gpadmin-\
[INFO]:-Expanding databasA.public.tableA
20170420:10:44:52:003994 gpexpand:hostA:gpadmin-\
[INFO]:-Finished expanding databasA.public.tableA
20170420:12:08:41:016955 gpexpand:hostA:gpadmin-\
[INFO]:-EXPANSION COMPLETED SUCCESSFULLY
20170420:12:08:41:016955 gpexpand:hostA:gpadmin-[INFO]:-Exiting...
第十二步,确认分布其间网卡流量、集群状态等信息。
数据分布其间网卡流量如下,如图九:
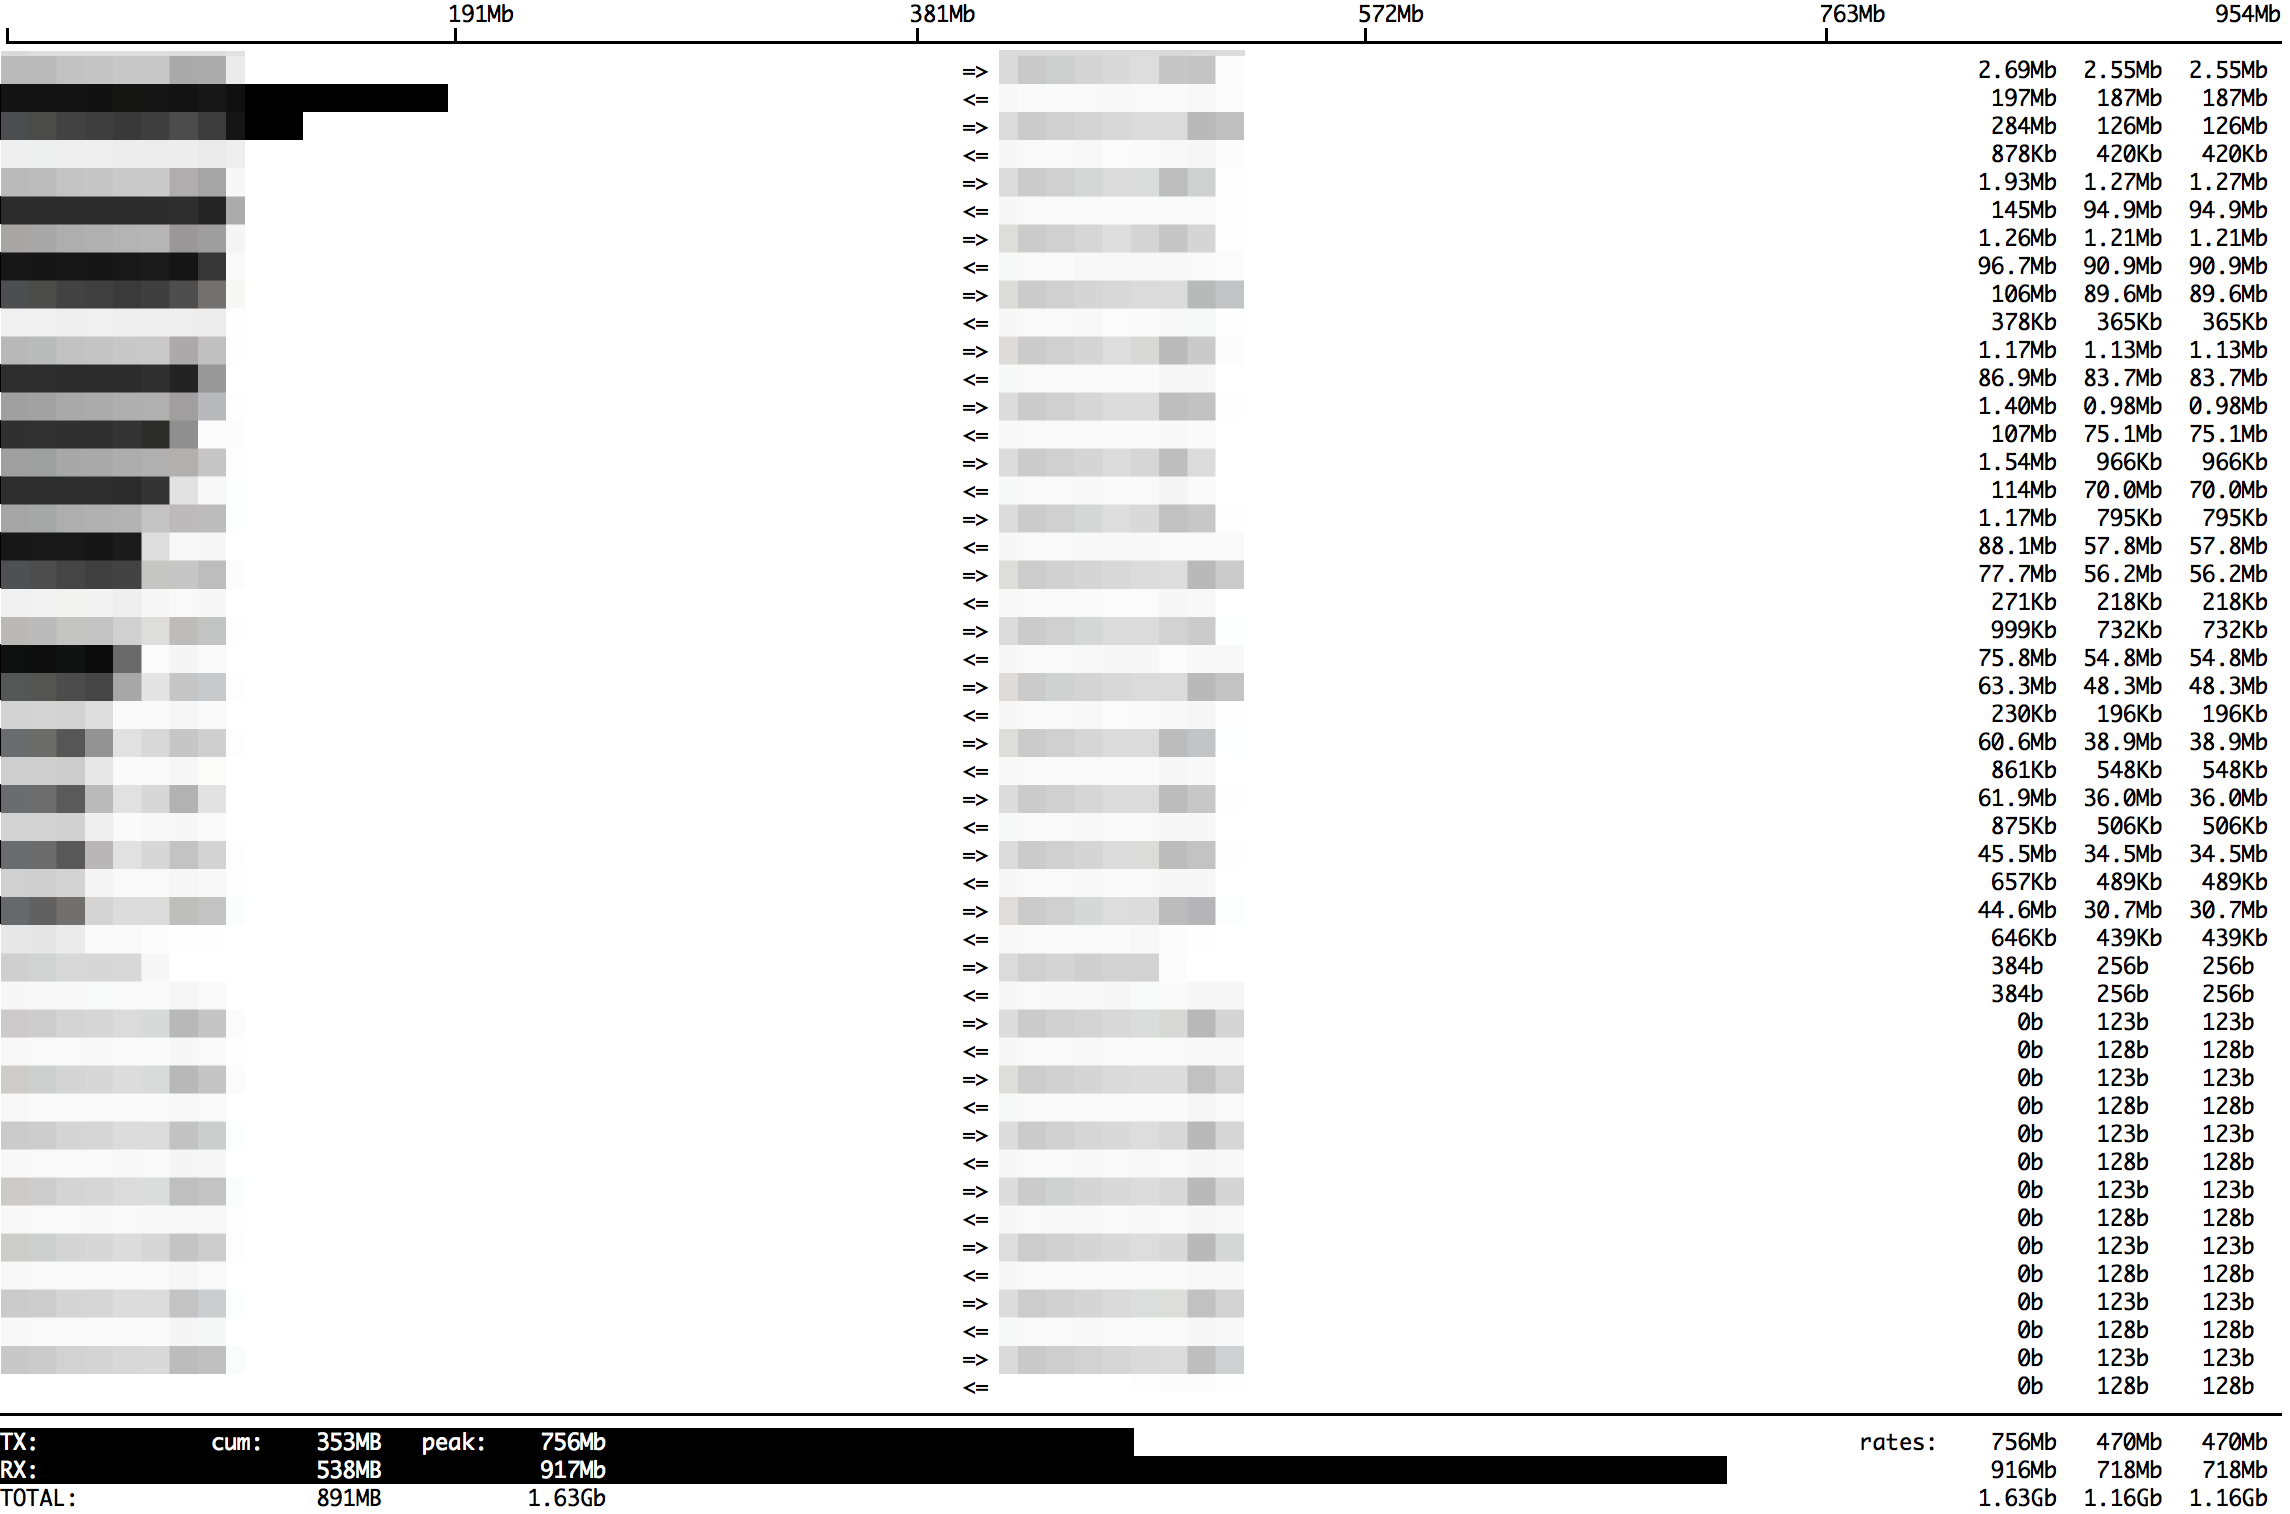
图九 数据分布其间网卡流量
分布数据期间的状态如下,如图十:
图十 分布数据期间的状态
分布数据过程会话如下,如图十一:

图十一 分布数据过程会话
第十三步,数据分布共耗时 2h 13min 54s, 确认数据分布后状态。
数据分布之后状态,如图十二:
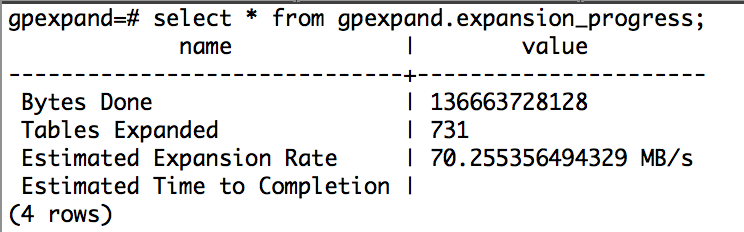
图十二 数据分布之后状态
分布之后集群状态,如图十三:
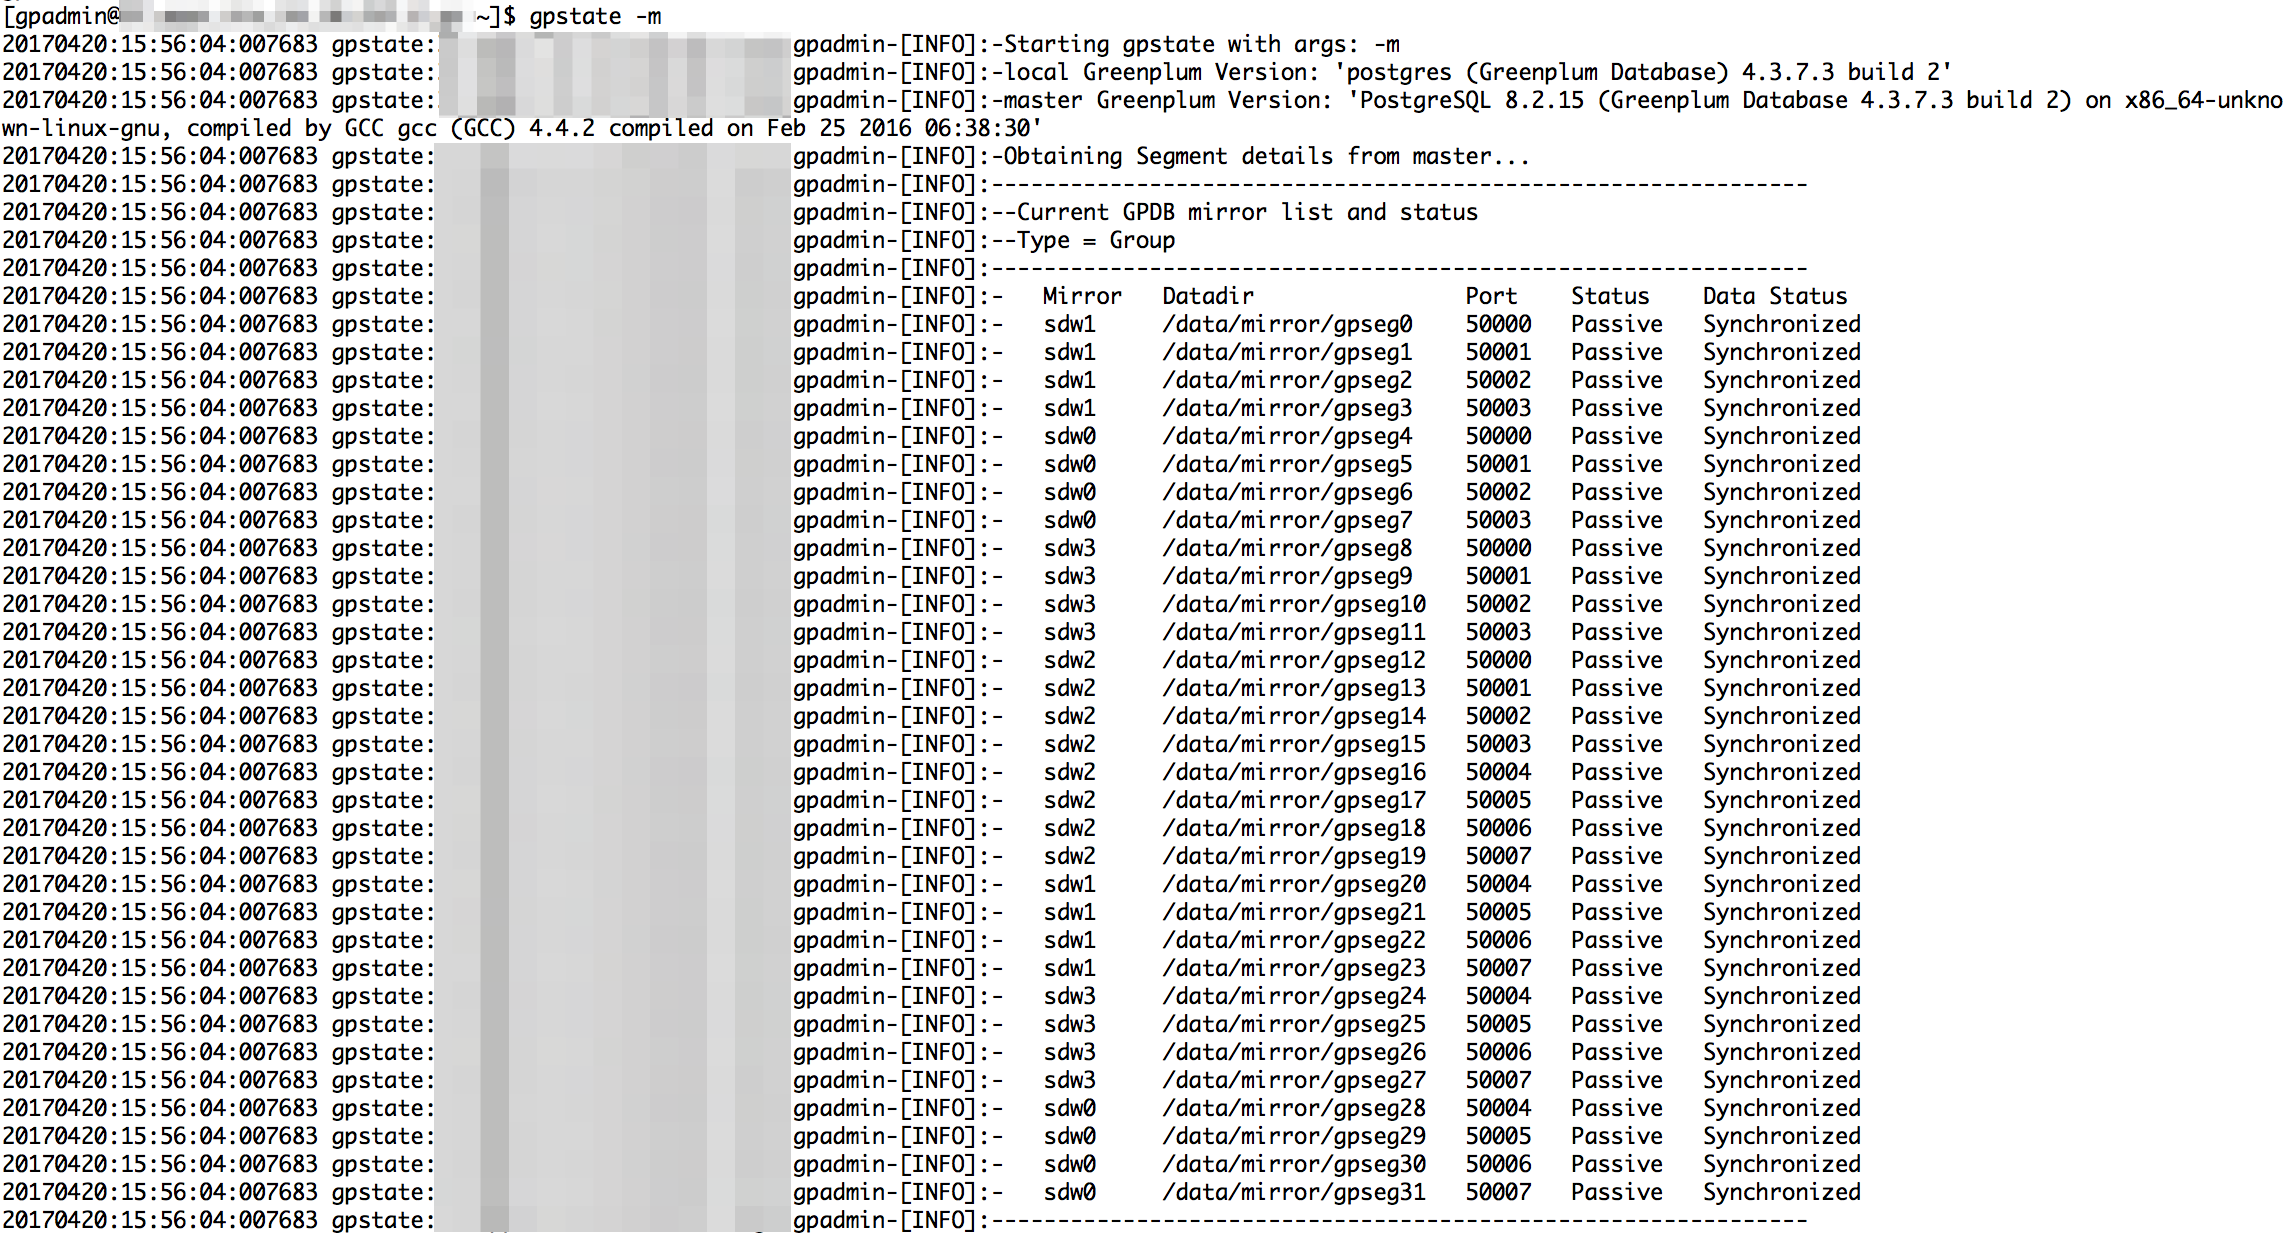
图十三 分布之后集群状态
数据分布之后的计算节点空间容量如图十四:

图十四 数据分布之后的计算节点空间容量
第十四步,数据分布之后清理。
gpexpand -c -D gpexpand
清理日志如图十五:

图十五 清理日志
0x05 注意事项
此次扩容遇到不少问题,总结如下:
- Greenplum 服务器不建议运行在非标准 SSH 端口上。
- root 和 gpadmin 用户都需要做 SSH 等效性验证。
- 扩容过程之前检测磁盘空间是否充裕、时间是否同步。
- 扩容过程中如果出现某张表没有分布,需要重新执行
gpexpand -d 60:00:00 -D gpexpand命令。 - 扩容过程中,注意告警信息,包括 Greenplum 机器负载、流量和进程数。
0x06 备忘
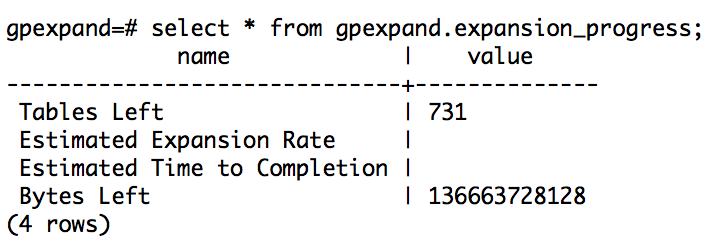
扩容过程中需要查询集群状态,这里给出部分用到的 SQL,留作备忘。
# 查询扩容状态
SELECT * FROM gpexpand.expansion_progress;
SELECT * FROM gpexpand.status order by updated;

# 查询当前会话
SELECT datname, usename, procpid, sess_id, current_query
FROM pg_stat_activity;

# 查看集群配置信息
SELECT dbid, content, role, mode, hostname, port
FROM gp_segment_configuration order by dbid;

# 查看 Greenplum 锁状态
SELECT locktype, database, c.relname, l.relation,
l.transactionid, l.transaction, l.pid, l.mode, l.granted,
a.current_query
        FROM pg_locks l, pg_class c, pg_stat_activity a
        WHERE l.relation=c.oid AND l.pid=a.procpid
        ORDER BY c.relname;
0x07 小结
此次扩容测试旨在为日后的 Greenplum 做技术沉淀,希望对大家有所帮助。
本站推广
币安是全球领先的数字货币交易平台,提供比特币、以太坊、BNB 以及 USDT 交易。
币安注册: https://accounts.binancezh.pro/cn/register/?ref=11190872 邀请码: 11190872
0x08 参考
- [1] 何勇 陈晓峰. 2014-10. Greenplum 企业应用实战. 北京. 机械工业出版社. 第 13 章 数据库扩容. P299.
- [2] darkbaby123 (2017-02). 用 PostgreSQL 的 COPY 导入导出 CSV. Retrieved from https://ruby-china.org/topics/32293.
- [3] Greenplum 官方 (2016-01). Expanding a Greenplum System. Retrieved from https://gpdb.docs.pivotal.io/4370/admin_guide/expand/expand-main.html.
–EOF–
版权声明:自由转载-非商用-非衍生-保持署名(创意共享4.0许可证)