原文链接 http://codepub.cn/2015/05/07/Compile-the-Language-Technology-Platform-C-and-LTP4J-Java-source-code/
注:以下为加速网络访问所做的原文缓存,经过重新格式化,可能存在格式方面的问题,或偶有遗漏信息,请以原文为准。
JDK:java version "1.8.0_31" Java(TM) SE Runtime Environment (build 1.8.0_31-b13) Java HotSpot(TM) 64-Bit Server VM (build 25.31-b07, mixed mode) OS:win7 64bit cmake:V2.8.12/V3.2.2 LTP:V3.2.0 LTP4J:V1.0 Microsoft VS C++:V2010
编译LTP4J.jar
下载Ant
ltp4j的源码使用ant进行编译,首先需要下载ant,点我下载
配置Ant环境变量
我的电脑-->属性-->高级系统设置-->环境变量 新建ANT_HOME值为:“D:\apache-ant-1.9.4” 编辑PATH,在PATH变量值的末尾添加:“;%ANT_HOME%\bin” 验证是否配置成功,打开cmd,输入ant:
C:\Users\TKPad>ant Buildfile: build.xml does not exist! Build failed
这样的话,说明配置成功,因为ant默认运行build.xml文件,该文件需要手动创建。
编译LTP4J
首先需要下载ltp4j源代码,下载完成之后,解压,比如我的地址为:D:\ltp4j-master(推荐重命名为ltp4j),打开cmd,进入d盘ltp4j项目根目录下,运行ant命令,得到:
D:\ltp4j>ant Buildfile: D:\ltp4j\build.xml clean: [delete] Deleting directory D:\ltp4j\output compile: [mkdir] Created dir: D:\ltp4j\output\classes [javac] D:\ltp4j\build.xml:17: warning: 'includeantruntime' was not set, def aulting to build.sysclasspath=last; set to false for repeatable builds [javac] Compiling 7 source files to D:\ltp4j\output\classes jar: [mkdir] Created dir: D:\ltp4j\output\jar [jar] Building jar: D:\ltp4j\output\jar\ltp4j.jar main: BUILD SUCCESSFUL Total time: 4 seconds
说明编译成功!查看目录:D:\ltp4j\output\jar,发现存在ltp4j.jar文件,这时该Jar包就可以使用了。
编译C++代理程序
安装CMake
ltp4j使用的C++代理程序使用编译工具CMake构建项目。 在编译代理程序之前,你需要首先安装CMake。 CMake的网站在这里。如果你是Windows用户,请下载CMake的二进制安装包;如果你是Linux,Mac OS或Cygwin的用户,可以通过编译源码的方式安装CMake,当然,你也可以使用Linux的软件源来安装。
下载地址点这里,我选择的是Windows ZIP cmake-3.2.2-win32-x86.zip
下载LTP的C++源码
下载地址,下载完成之后解压,我的存放路径为:D:\ltp-master(推荐重命名为ltp)。
配置LTP的安装路径
修改D:\ltp4j目录下的CMakeLists.txt文件,修改如下部分的斜体加粗部分为你自己的LTP源码路径
find_package(JNI) set (LTP_HOME "D:/ltp" CACHE STRING "Use to specified ltp path") set (LIBRARY_OUTPUT_PATH \${PROJECT_SOURCE_DIR}/libs) set (JNI_SOURCE_DIR \${PROJECT_SOURCE_DIR}/jni)
构建VC Project
在项目文件夹下新建一个名为build的文件夹,使用CMake Gui,在source code中填入项目文件夹,在binaries中填入build文件夹。然后Configure --> Generate。
在点击configure之后出现如下错误:
The C compiler identification is unknown The CXX compiler identification is unknown CMake Error at CMakeLists.txt:2 (project): No CMAKE_C_COMPILER could be found. CMake Error at CMakeLists.txt:2 (project): No CMAKE_CXX_COMPILER could be found.Configuring incomplete, errors occurred! See also "D:/ltp4j/build/CMakeFiles/CMakeOutput.log". See also "D:/ltp4j/build/CMakeFiles/CMakeError.log".
那么可能是你的电脑上还没有C++编译环境,需要安装Microsoft Visual Studio C++,VS 2010 express版下载地址为:点我下载VS2010
安装完成之后,再次编译,如果出现:
The C compiler "C:/Program Files (x86)/Microsoft Visual Studio 10.0/VC/bin/cl.exe" is not able to compile a simple test program.
那么参考文章里面的解决办法,说简单点就是以管理员权限运行c1.exe 解决办法如下:
- Right-Click->Properties on cl.exe in your VS install directory (the exact path appears in the CMake error);
- Choose the Compatibility Tab;
- Check "Run this program as administrator" in the "Privilege Level" box.
之后再次尝试编译,出现如下错误:
CMake Error at CMakeLists.txt:2 (project): Cannot enable 64-bit tools with Visual Studio 2010 Express. Install the Microsoft Windows SDK v7.1 to get 64-bit tools: http://msdn.microsoft.com/en-us/windows/bb980924.aspx Configuring incomplete, errors occurred!
主要是因为32位版本不兼容造成的,打开地址,点击download下载Microsoft Windows SDK for Windows 7 and .NET Framework 4,下载完成之后运行即是在线安装的形式。如果以cmd命令行的形式运行cmake,需要将cmake的bin目录路径加入到操作系统的path变量中。
在configure阶段,再次出错
The C compiler identification is MSVC 16.0.30319.1 The CXX compiler identification is MSVC 16.0.30319.1 Check for working C compiler using: Visual Studio 10 Check for working C compiler using: Visual Studio 10 -- broken CMake Error at D:/cmake-2.8.12.1-win32-x86/share/cmake-2.8/Modules/CMakeTestCCompiler.cmake:61 (message): The C compiler "C:/Program Files (x86)/Microsoft Visual Studio 10.0/VC/bin/cl.exe" is not able to compile a simple test program. It fails with the following output: Change Dir: D:/ltp4j/build/CMakeFiles/CMakeTmp Run Build Command:C:\Windows\Microsoft.NET\Framework\v4.0.30319\MSBuild.exe cmTryCompileExec1255268599.vcxproj /p:Configuration=Debug /p:VisualStudioVersion=10.0 Microsoft(R) 生成引擎版本 4.0.30319.17929 [Microsoft .NET Framework 版本 4.0.30319.18063] 版权所有(C) Microsoft Corporation 2007。保留所有权利。 生成启动时间为 2015/5/6 9:46:05。 节点 1 上的项目“D:\ltp4j\build\CMakeFiles\CMakeTmp\cmTryCompileExec1255268599.vcxproj”(默认目标)。 PrepareForBuild: 正在创建目录“cmTryCompileExec1255268599.dir\Debug\”。 正在创建目录“D:\ltp4j\build\CMakeFiles\CMakeTmp\Debug\”。 InitializeBuildStatus: 正在创建“cmTryCompileExec1255268599.dir\Debug\cmTryCompileExec1255268599.unsuccessfulbuild”,因为已指定“AlwaysCreate”。 ClCompile: C:\Program Files (x86)\Microsoft Visual Studio 10.0\VC\bin\CL.exe /c /Zi /W3 /WX- /Od /Ob0 /Oy- /D WIN32 /D _WINDOWS /D _DEBUG /D "CMAKE_INTDIR=\"Debug\"" /D _MBCS /Gm- /RTC1 /MDd /GS /fp:precise /Zc:wchar_t /Zc:forScope /Fo"cmTryCompileExec1255268599.dir\Debug\" /Fd"cmTryCompileExec1255268599.dir\Debug\vc100.pdb" /Gd /TC /analyze- /errorReport:queue testCCompiler.c 用于 80x86 的 Microsoft (R) 32 位 C/C++ 优化编译器 16.00.30319.01 版 版权所有(C) Microsoft Corporation。保留所有权利。 cl /c /Zi /W3 /WX- /Od /Ob0 /Oy- /D WIN32 /D _WINDOWS /D _DEBUG /D "CMAKE_INTDIR=\"Debug\"" /D _MBCS /Gm- /RTC1 /MDd /GS /fp:precise /Zc:wchar_t /Zc:forScope /Fo"cmTryCompileExec1255268599.dir\Debug\" /Fd"cmTryCompileExec1255268599.dir\Debug\vc100.pdb" /Gd /TC /analyze- /errorReport:queue testCCompiler.c testCCompiler.c ManifestResourceCompile: C:\Program Files (x86)\Microsoft SDKs\Windows\v7.0A\bin\rc.exe /nologo /fo"cmTryCompileExec1255268599.dir\Debug\cmTryCompileExec1255268599.exe.embed.manifest.res" cmTryCompileExec1255268599.dir\Debug\cmTryCompileExec1255268599_manifest.rc Link: C:\Program Files (x86)\Microsoft Visual Studio 10.0\VC\bin\link.exe /ERRORREPORT:QUEUE /OUT:"D:\ltp4j\build\CMakeFiles\CMakeTmp\Debug\cmTryCompileExec1255268599.exe" /INCREMENTAL /NOLOGO kernel32.lib user32.lib gdi32.lib winspool.lib shell32.lib ole32.lib oleaut32.lib uuid.lib comdlg32.lib advapi32.lib /MANIFEST /ManifestFile:"cmTryCompileExec1255268599.dir\Debug\cmTryCompileExec1255268599.exe.intermediate.manifest" /MANIFESTUAC:"level='asInvoker' uiAccess='false'" /DEBUG /PDB:"D:/ltp4j/build/CMakeFiles/CMakeTmp/Debug/cmTryCompileExec1255268599.pdb" /SUBSYSTEM:CONSOLE /TLBID:1 /DYNAMICBASE /NXCOMPAT /IMPLIB:"D:/ltp4j/build/CMakeFiles/CMakeTmp/Debug/cmTryCompileExec1255268599.lib" /MACHINE:X86 cmTryCompileExec1255268599.dir\Debug\cmTryCompileExec1255268599.exe.embed.manifest.res cmTryCompileExec1255268599.dir\Debug\testCCompiler.obj /machine:X86 /debug LINK : fatal error LNK1123: 转换到 COFF 期间失败: 文件无效或损坏 [D:\ltp4j\build\CMakeFiles\CMakeTmp\cmTryCompileExec1255268599.vcxproj] 已完成生成项目“D:\ltp4j\build\CMakeFiles\CMakeTmp\cmTryCompileExec1255268599.vcxproj”(默认目标)的操作 失败。 生成失败。 “D:\ltp4j\build\CMakeFiles\CMakeTmp\cmTryCompileExec1255268599.vcxproj”(默认目标) (1) -> (Link 目标) -> LINK : fatal error LNK1123: 转换到 COFF 期间失败: 文件无效或损坏 [D:\ltp4j\build\CMakeFiles\CMakeTmp\cmTryCompileExec1255268599.vcxproj] 0 个警告 1 个错误 已用时间 00:00:00.81 CMake will not be able to correctly generate this project. Call Stack (most recent call first): CMakeLists.txt:2 (project) Configuring incomplete, errors occurred! See also "D:/ltp4j/build/CMakeFiles/CMakeOutput.log". See also "D:/ltp4j/build/CMakeFiles/CMakeError.log".
该问题可能是由于.NET Framework 4.5导致,解决办法是:
CMake doesn't seem to work if .net 4.5 is installed. If you run into this issue you have to uninstall .net 4.5. Uninstalling .net 4.5 seems to break Visual Studio so then you have to re-install VS2010.
简单点说就是,卸载.net 4.5,安装.net 4.0(如果电脑已经安装,就不必装了),在卸载.net 4.5会破坏VS2010,所以需要重新再安装一遍VS2010。参考文章1、参考文章2;安装完毕之后,重新以管理员身份的权限运行cmake-gui.exe,点击configure之后,会弹出对话框,如果是VC++2010的话,建议选择Visual Studio 10,如下图:
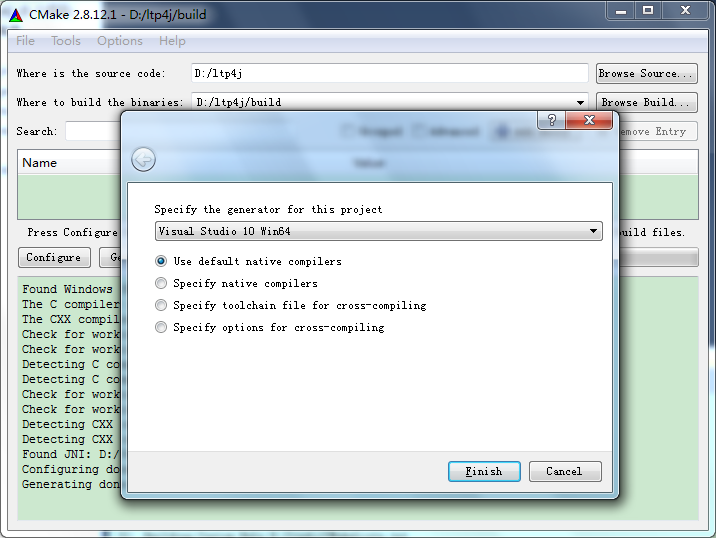 点击finish->configure,此时进度条开始变为绿色滚动。
The C compiler identification is MSVC 16.0.30319.1 The CXX compiler identification is MSVC 16.0.30319.1 Check for working C compiler using: Visual Studio 10 Check for working C compiler using: Visual Studio 10 -- works Detecting C compiler ABI info Detecting C compiler ABI info - done Check for working CXX compiler using: Visual Studio 10 Check for working CXX compiler using: Visual Studio 10 -- works Detecting CXX compiler ABI info Detecting CXX compiler ABI info - done Found JNI: D:/Program Files/Java/jdk1.8.0_31/lib/jawt.lib
Configuring done
configure结束之后点击generate。 如果您依然没有运行成功,那么建议使用cmake3.x之前的版本,原因是:
Visual Studio 11 Win64 is the wrong generator for Visual Studio 2013. You need to use Visual Studio 12 2013 Win64 if you are using cmake-3.x or Visual Studio 12 Win64 for cmake-2.8.x.
cmake3.x之前的版本下载地址:http://www.cmake.org/files/v2.8/
编译源码
构建后得到ALL_BUILD、RUN_TESTS、ZERO_CHECK三个VC Project。使用VS打开ALL_BUILD项目,选择Release(*)方式构建项目。
(注:boost::multi_array与VS2010不兼容的bug已经在3.1.0中得到修复,3.1.x及以上版本已经可以使用Debug方式构建,但出于效率考虑,仍旧建议使用Release方式构建。)
注意事项
- 该处编译需要设置Java环境变量JAVA_HOME。
- 需要保持c++编译器与JDK同是32位或者64位,否则JVM不能加载生成的动态库
编译源码出现
LINK : fatal error LNK1104: cannot open file 'kernel32.lib'
原因是
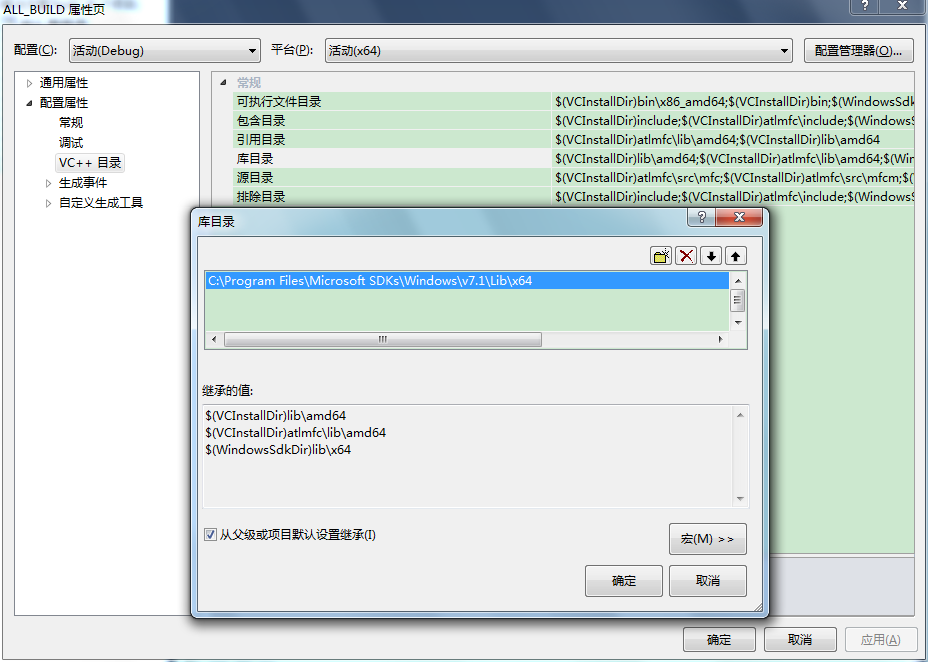
Check the VC++ directories, in VS 2010 these can be found in your project properties. Check whether “\$(WindowsSdkDir)\lib” is included in the directories list, if not, manually add it. If you're building for X64 platform, you should select X64 from the “Platform” ComboBox, and make sure that “$(WindowsSdkDir)\lib\x64” is included in the directories list.
如果X64目录不包含在库目录中,需要手动添加到库目录中。如下图所示
编译LTP
再次编译LTP4J出现如下错误:
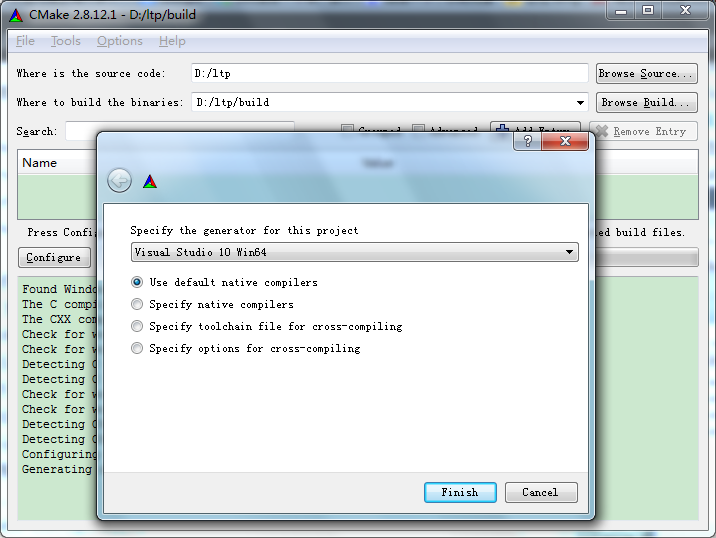
LINK : fatal error LNK1181: cannot open input file 'postagger.lib' LINK : fatal error LNK1181: cannot open input file 'ner.lib'
这是因为在编译LTP4J之前需要编译LTP,使用cmake构建LTP,如下图
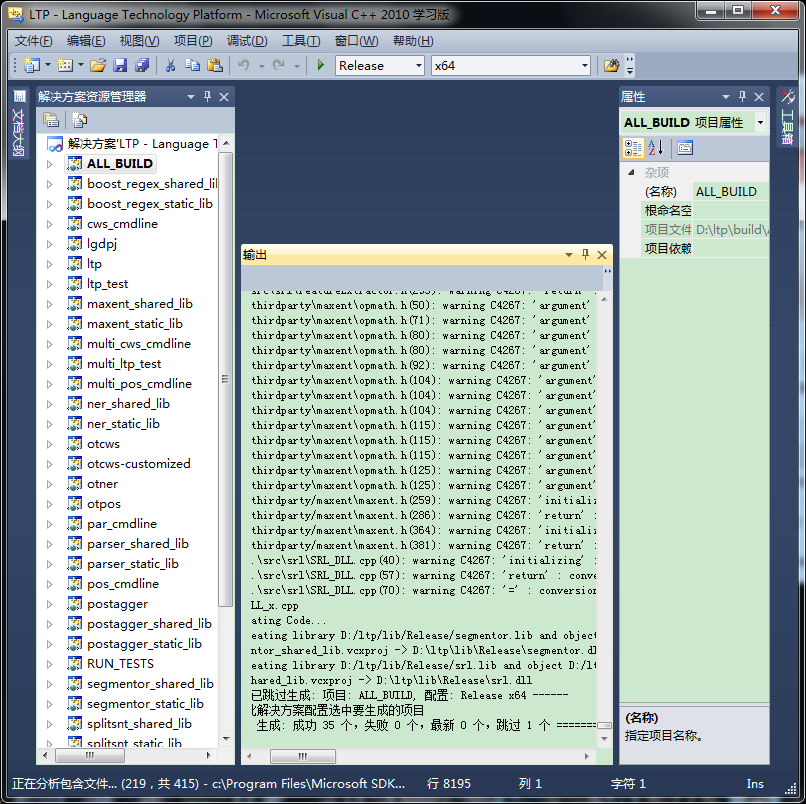
 之后在LTP的build目录下会生成VS Project,用VS打开D:\ltp\build\ALL_BUILD.vcxproj,使用Release X64方式进行编译,如果顺利的话,编译结果见下图
再次编译LTP4J
在LTP编译成功之后,将D:\ltp\lib\Release下的所有文件拷贝到D:\ltp4j\build目录下,然后在VS中打开D:\ltp4j\build\ALL_BUILD.vcxproj,选择Release X64进行编译,编译结果如下:
1>------ 已启动生成: 项目: ZERO_CHECK, 配置: Release x64 ------ 2>------ 已启动生成: 项目: split_sentence_jni, 配置: Release x64 ------ 3>------ 已启动生成: 项目: segmentor_jni, 配置: Release x64 ------ 4>------ 已启动生成: 项目: srl_jni, 配置: Release x64 ------ 5>------ 已启动生成: 项目: parser_jni, 配置: Release x64 ------ 2> Creating library D:/ltp4j/libs/Release/split_sentence_jni.lib and object D:/ltp4j/libs/Release/split_sentence_jni.exp 3> Creating library D:/ltp4j/libs/Release/segmentor_jni.lib and object D:/ltp4j/libs/Release/segmentor_jni.exp 3> segmentor_jni.vcxproj -> D:\ltp4j\libs\Release\segmentor_jni.dll 4> Creating library D:/ltp4j/libs/Release/srl_jni.lib and object D:/ltp4j/libs/Release/srl_jni.exp 5> Creating library D:/ltp4j/libs/Release/parser_jni.lib and object D:/ltp4j/libs/Release/parser_jni.exp 2> split_sentence_jni.vcxproj -> D:\ltp4j\libs\Release\split_sentence_jni.dll 5> parser_jni.vcxproj -> D:\ltp4j\libs\Release\parser_jni.dll 4> srl_jni.vcxproj -> D:\ltp4j\libs\Release\srl_jni.dll 6>------ 已启动生成: 项目: ner_jni, 配置: Release x64 ------ 7>------ 已启动生成: 项目: postagger_jni, 配置: Release x64 ------ 6> Creating library D:/ltp4j/libs/Release/ner_jni.lib and object D:/ltp4j/libs/Release/ner_jni.exp 7> Creating library D:/ltp4j/libs/Release/postagger_jni.lib and object D:/ltp4j/libs/Release/postagger_jni.exp 6> ner_jni.vcxproj -> D:\ltp4j\libs\Release\ner_jni.dll 7> postagger_jni.vcxproj -> D:\ltp4j\libs\Release\postagger_jni.dll 8>------ 已跳过生成: 项目: ALL_BUILD, 配置: Release x64 ------ 8>没有为此解决方案配置选中要生成的项目 ========== 生成: 成功 7 个,失败 0 个,最新 0 个,跳过 1 个 ==========
在Eclipse中使用离线版LTP
配置Eclipse中项目所需资源
在Eclipse中新建Java Project
- 导入ltp4j.jar
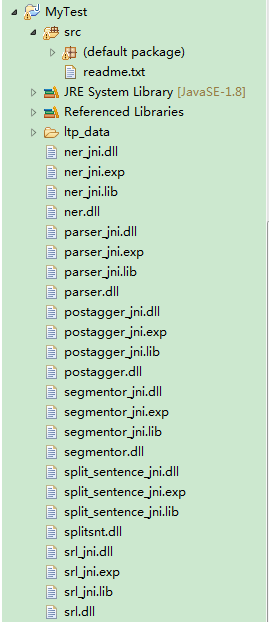
- windows下将ltp4j的libs文件夹中生成的所有动态库、以及原ltp lib文件夹下的splitsnt、segmentor、postagger、ner、parser、srl 6个动态库拷贝到项目根目录
- linux下export LD_LIBRARY_PATH=#jni动态库路径#
配置完成之后,项目视图如下所示:
 #### 本地接口使用示例
分词接口
import java.util.ArrayList;
import java.util.List;

import edu.hit.ir.ltp4j.Segmentor;

/**
*
* <p>
* ClassName TestSegment
* </p>
* <p>
* Description 分词接口
* </p>
*
* @author TKPad wangx89@126.com
*        <p>
*        Date 2015年5月7日 下午10:09:23
*        </p>
* @version V1.0.0
*
*/
public class TestSegment {
    public static void main(String[] args) {
        // /MyTest/
        if (Segmentor.create("ltp_data/cws.model") < 0) {
            System.err.println("load failed");
            return;
        }
        String sent = "我是中国人";
        List<String> words = new ArrayList<String>();
        int size = Segmentor.segment(sent, words);

        for (int i = 0; i < size; i++) {
            System.out.print(words.get(i));
            if (i == size - 1) {
                System.out.println();
            } else {
                System.out.print("\t");
            }
        }
        Segmentor.release();
    }
}
词性标注接口
import java.util.ArrayList;
import java.util.List;

import edu.hit.ir.ltp4j.Postagger;

/**
*
* <p>
* ClassName TestPostag
* </p>
* <p>
* Description 词性标注接口
* </p>
*
* @author TKPad wangx89@126.com
*        <p>
*        Date 2015年5月7日 下午10:09:55
*        </p>
* @version V1.0.0
*
*/
public class TestPostag {
    public static void main(String[] args) {
        if (Postagger.create("ltp_data/pos.model") < 0) {
            System.err.println("load failed");
            return;
        }

        List<String> words = new ArrayList<String>();
        words.add("我");
        words.add("是");
        words.add("中国");
        words.add("人");
        List<String> postags = new ArrayList<String>();

        int size = Postagger.postag(words, postags);
        for (int i = 0; i < size; i++) {
            System.out.print(words.get(i) + "_" + postags.get(i));
            if (i == size - 1) {
                System.out.println();
            } else {
                System.out.print("|");
            }
        }
        Postagger.release();
    }
}
命名实体识别接口
import java.util.ArrayList;
import java.util.List;

import edu.hit.ir.ltp4j.NER;

/**
*
* <p>
* ClassName TestNer
* </p>
* <p>
* Description 命名实体识别接口
* </p>
*
* @author TKPad wangx89@126.com
*        <p>
*        Date 2015年5月7日 下午10:08:26
*        </p>
* @version V1.0.0
*
*/
public class TestNer {

    public static void main(String[] args) {
        if (NER.create("ltp_data/ner.model") < 0) {
            System.err.println("load failed");
            return;
        }
        List<String> words = new ArrayList<String>();
        List<String> tags = new ArrayList<String>();
        List<String> ners = new ArrayList<String>();
        words.add("中国");
        tags.add("ns");
        words.add("国际");
        tags.add("n");
        words.add("广播");
        tags.add("n");
        words.add("电台");
        tags.add("n");
        words.add("创办");
        tags.add("v");
        words.add("于");
        tags.add("p");
        words.add("1941年");
        tags.add("m");
        words.add("12月");
        tags.add("m");
        words.add("3日");
        tags.add("m");
        words.add("。");
        tags.add("wp");

        NER.recognize(words, tags, ners);

        for (int i = 0; i < words.size(); i++) {
            System.out.println(ners.get(i));
        }

        NER.release();

    }
}
依存句法分析接口
import java.util.ArrayList;
import java.util.List;

import edu.hit.ir.ltp4j.Parser;

/**
*
* <p>
* ClassName TestParser
* </p>
* <p>
* Description 依存句法分析接口
* </p>
*
* @author TKPad wangx89@126.com
*        <p>
*        Date 2015年5月7日 下午10:11:09
*        </p>
* @version V1.0.0
*
*/
public class TestParser {

    public static void main(String[] args) {
        if (Parser.create("ltp_data/parser.model") < 0) {
            System.err.println("load failed");
            return;
        }
        List<String> words = new ArrayList<String>();
        List<String> tags = new ArrayList<String>();
        words.add("一把手");
        tags.add("n");
        words.add("亲自");
        tags.add("d");
        words.add("过问");
        tags.add("v");
        words.add("。");
        tags.add("wp");
        List<Integer> heads = new ArrayList<Integer>();
        List<String> deprels = new ArrayList<String>();

        int size = Parser.parse(words, tags, heads, deprels);

        for (int i = 0; i < size; i++) {
            System.out.print(heads.get(i) + ":" + deprels.get(i));
            if (i == size - 1) {
                System.out.println();
            } else {
                System.out.print("        ");
            }
        }

        Parser.release();
    }
}
语义角色标注接口
import java.util.ArrayList;
import java.util.List;

import edu.hit.ir.ltp4j.Pair;
import edu.hit.ir.ltp4j.SRL;

/**
*
* <p>
* ClassName TestSrl
* </p>
* <p>
* Description 语义角色标注接口
* </p>
*
* @author TKPad wangx89@126.com
*        <p>
*        Date 2015年5月7日 下午10:11:46
*        </p>
* @version V1.0.0
*
*/
public class TestSrl {

    public static void main(String[] args) {
        SRL.create("ltp_data/srl");
        ArrayList<String> words = new ArrayList<String>();
        words.add("一把手");
        words.add("亲自");
        words.add("过问");
        words.add("。");
        ArrayList<String> tags = new ArrayList<String>();
        tags.add("n");
        tags.add("d");
        tags.add("v");
        tags.add("wp");
        ArrayList<String> ners = new ArrayList<String>();
        ners.add("O");
        ners.add("O");
        ners.add("O");
        ners.add("O");
        ArrayList<Integer> heads = new ArrayList<Integer>();
        heads.add(2);
        heads.add(2);
        heads.add(-1);
        heads.add(2);
        ArrayList<String> deprels = new ArrayList<String>();
        deprels.add("SBV");
        deprels.add("ADV");
        deprels.add("HED");
        deprels.add("WP");
        List<Pair<Integer, List<Pair<String, Pair<Integer, Integer>>>>> srls = new ArrayList<Pair<Integer, List<Pair<String, Pair<Integer, Integer>>>>>();
        SRL.srl(words, tags, ners, heads, deprels, srls);
        System.out.println(srls.size());
        for (int i = 0; i < srls.size(); ++i) {
            System.out.println(srls.get(i).first + ":");
            for (int j = 0; j < srls.get(i).second.size(); ++j) {
                System.out.println("  tpye = " + srls.get(i).second.get(j).first + " beg = "
                        + srls.get(i).second.get(j).second.first + " end = " + srls.get(i).second.get(j).second.second);
            }
        }
        SRL.release();
    }
}
等等,最后一步
注意点 在ltp4j中提供的ltp_data中的model仅仅是作为你测试代码的正确性,其并非完整的model,如果需要在生产环境中使用,需要到这里下载完整版的model,将下载的完整版ltp_data拷贝到项目中即可。
其他错误
Cannot open include file: 'ammintrin.h': No such file or directory
参考如下文章 http://wishmesh.com/2011/04/fatal-error-c1083-cannot-open-include-file-ammintrin-h-no-such-file-or-directory/
https://connect.microsoft.com/VisualStudio/feedback/details/660584/
参考文献 【1】 哈工大LTP官网 【2】 LTP4J的github地址 【3】 LTP的github地址 【4】 LTP3.0参考文档 【5】 LTP4J1.0参考文档 【6】 VS2010与64位系统 【7】 安装 Microsoft Visual C++ 2010 和 Microsoft Windows SDK 7.1